Affiliate disclosure: TBB 787 is a participant in the Amazon Services LLC Associates Program. If you buy through links on this page, we may earn a commission at no extra cost to you. Our picks come from independent research, and no manufacturer paid to be included.
For most of history, seeing a galaxy with your own equipment meant years of practice. You had to learn the constellations, master a heavy equatorial mount, polar align it in the cold, buy a dedicated astronomy camera, and then spend hours processing images on a computer. Smart telescopes have changed all of that. You set one on a table or tripod, tap a target in an app on your phone, and within minutes the Orion Nebula or the Andromeda Galaxy starts to appear on your screen in color, getting clearer with every passing second.
It is one of the most exciting developments in amateur astronomy in decades, and prices have fallen fast. In 2026 you can buy a capable smart telescope for around the price of a good smartphone, while premium models with larger optics rival what serious astrophotographers were achieving with thousands of dollars of separate equipment only a few years ago.
This guide explains how smart telescopes work, what they can and cannot show you, and which models are worth buying right now. We compare the most popular options from ZWO (Seestar), DWARFLAB, Unistellar, Vaonis and Celestron, and we also tell you honestly when a traditional telescope would be the better choice.
Quick Picks: Best Smart Telescopes in 2026
| Model | Best For | Aperture | Price on Amazon (Oct 2026) |
|---|---|---|---|
| ZWO Seestar S30 Pro | Best overall for most people | 30 mm | About $699 |
| DWARFLAB DWARF 3 | Best for travel and daytime photos too | 35 mm | About $549 |
| DWARFLAB DWARF Mini | Best budget and lightest | 30 mm | About $419 |
| Vaonis Vespera II | Best premium design | 50 mm | About $1,590 |
| Unistellar Odyssey | Best larger aperture under $3,000 | 85 mm | About $2,599 |
| Celestron Origin Mark II | Best image quality, money no object | 152 mm (6-inch) | About $4,299 |
| Celestron StarSense Explorer DX 130AZ | Best traditional alternative (eyepiece viewing) | 130 mm | About $500 |
Prices are what we saw on Amazon in October 2026 and change often, especially around Black Friday and the holidays. Always check the current price before buying. ZWO’s 50 mm Seestar S50 Pro is also excellent but is mainly sold directly by ZWO and astronomy dealers rather than on Amazon; we cover it below.
What Is a Smart Telescope?
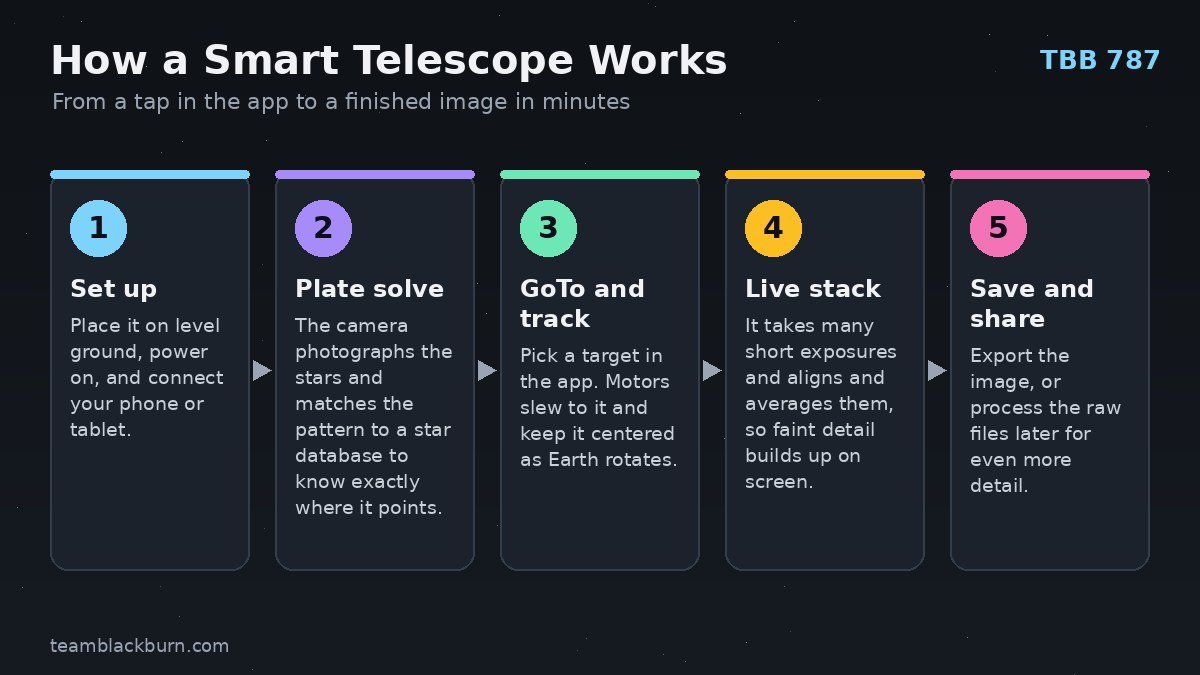
A smart telescope is a compact, fully automated imaging system. Instead of an eyepiece, it has a built-in astronomy camera behind its lens. A small computer inside controls the motorized mount, the camera, the focuser and often a filter wheel. You control everything from an app on a phone or tablet over Wi-Fi or Bluetooth.
Three technologies make smart telescopes work, and understanding them helps you choose a good one.
Plate solving: knowing exactly where it is pointing
When you switch on a smart telescope, it takes a quick picture of the sky and compares the pattern of stars with a built-in star catalog. Just as you might recognize a city from the shape of its skyline, the telescope recognizes its exact position from the star pattern. This is called plate solving. It means you never need to align the telescope on known stars or learn the constellations first. The telescope works out where it is on its own, usually in under a minute.
GoTo and tracking: finding and following targets
Once it knows where it is pointing, the telescope can slew automatically to any object you choose in the app. Then it tracks that object, moving slowly to compensate for Earth’s rotation so the target stays centered. Without tracking, objects drift out of view within seconds at high magnification.
Live stacking: building a bright, clean image
Deep-sky objects such as nebulae and galaxies are incredibly faint. A single short exposure only captures a little of their light, and it is noisy. A smart telescope takes many short exposures, typically 10 to 30 seconds each, aligns them, and averages them together in real time. Random noise cancels out while the faint signal adds up, so the image on your screen grows brighter and more detailed the longer you leave the telescope running. This technique, called stacking, used to require separate software and hours of computer time. Smart telescopes do it automatically, live, while you watch.
What Can You Actually See?
It is important to set realistic expectations, because smart telescopes are brilliant at some things and limited at others.
What they do brilliantly
- Nebulae: Glowing clouds of gas such as the Orion Nebula, the Lagoon Nebula, the Ring Nebula and the North America Nebula appear in color, with structure you could never see by eye through a small telescope. Models with a dual-band filter excel here, even from cities.
- Galaxies: The Andromeda Galaxy, the Triangulum Galaxy, the Whirlpool Galaxy and other bright galaxies show their shape, dust lanes and sometimes spiral arms after enough stacking time.
- Star clusters: Open clusters like the Pleiades and globular clusters like M13 look spectacular.
- The Moon: Craters, mountains and maria are captured in detail, often as a mosaic.
- The Sun: With the manufacturer’s certified solar filter properly fitted, many models can photograph sunspots safely. Never point any telescope at the Sun without the correct filter.
- Comets: When a bright comet appears, smart telescopes make capturing it easy.
Where they are limited
- Planets look small. Jupiter, Saturn and Mars are tiny in the wide field of view of most smart telescopes. You can see Saturn’s rings and Jupiter’s moons, but the detail is far less than you would get with a larger traditional telescope at high magnification.
- Most have no eyepiece. You view on a screen. Some people love that; others miss the magic of photons from a distant object landing directly in their eye. Unistellar’s Odyssey Pro and Vaonis’s designs address this in different ways, but most smart telescopes are screen-only.
- Images are good, not professional. Results from small smart telescopes are impressive and shareable, but a dedicated astrophotography rig with a large telescope, an equatorial mount and a cooled camera can still produce more detailed images.
If you are fascinated by the deep sky, the history of space exploration, and objects like the dark-matter-filled galaxies we describe in our article on the mysteries of dark matter and dark energy, a smart telescope can put those objects on your own screen in a single evening.
From Galileo to Smart Telescopes: A Short History
Smart telescopes are the latest chapter in a story that began more than 400 years ago. In 1609 and 1610, Galileo Galilei turned a small homemade refracting telescope toward the sky and discovered four moons orbiting Jupiter, the phases of Venus and the mountains of the Moon. Those observations helped overturn the idea that everything revolved around Earth. A few decades later, in 1668, Isaac Newton built one of the first practical reflecting telescopes, using a curved mirror instead of a lens, a design still used in most large telescopes today. We tell more of that story in our biography of Isaac Newton.
For centuries, astronomers could only sketch what they saw. Photography changed that in the nineteenth century, when early photographers captured the first images of the Moon, and by the twentieth century long-exposure photographs on glass plates revealed galaxies and nebulae far too faint for the eye. Electronic image sensors arrived in observatories in the 1970s and 1980s and eventually became cheap enough for amateurs. Digital cameras, computerized GoTo mounts and stacking software turned astrophotography into a serious hobby, but it remained complex and expensive.
The breakthrough idea behind smart telescopes was to combine all of those pieces into one automated device controlled by a phone. Companies such as Unistellar and Vaonis introduced early consumer smart telescopes in the late 2010s, and in 2023 ZWO’s Seestar S50 brought the concept to a much lower price, triggering a wave of competition. Today, a backpack-sized device can automatically do what once required an observatory, which is a remarkable example of how inventions build on each other over time.
How We Chose These Smart Telescopes
We did not run our own laboratory test of every unit. We compared models using published specifications, manufacturer documentation, independent astronomy reviews and community sample images, the quality and reliability of each brand’s app, current Amazon availability and pricing, and recurring patterns in owner feedback. We weighted the factors that most affect a beginner’s experience:
- Image quality: aperture, focal length, sensor resolution and filters.
- Ease of use: how quickly a new owner gets a good image, and how reliable the app is.
- Versatility: field of view, mosaic support, Moon and Sun imaging, daytime use, and equatorial mode for longer exposures.
- Portability: weight, size and battery life.
- Value: what you get for the money compared with alternatives.
1. ZWO Seestar S30 Pro: Best Smart Telescope for Most People
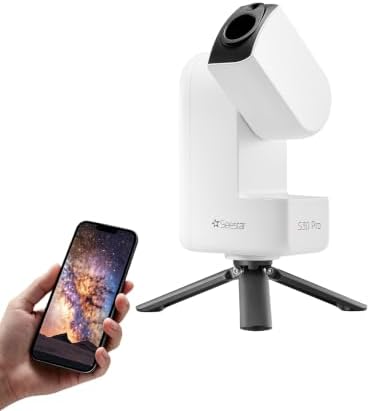
- 【Effortless Smart Telescope for Beginners】 Simply power on, connect the app, and start exploring the universe. With auto…
- 【Urban-Friendly Telescope for Clear Night Skies】 Seestar S30 Pro reduces color distortion with apochromatic optics for s…
- 【Dual-Camera 4K Imaging for Stunning Detail】 Capture sharper, higher-resolution astrophotography with dual-camera imagin…
ZWO is a well-known maker of astronomy cameras, and its Seestar line has done more than any other product to make smart telescopes mainstream. The Seestar S30 Pro is the model we recommend to most beginners in 2026 because it combines a modern 8-megapixel (4K) sensor, a wide field of view, an excellent app and a light, portable body at a price that is still reasonable.
Key specifications: a 30 mm aperture with a 160 mm focal length, an 8 MP main sensor, a wide-angle secondary camera for framing (Amazon lists it as a “4K dual camera” design), a native field of view of roughly 2.3 by 4 degrees, about 1.65 kg of weight, a built-in battery rated for around six hours, 128 GB of storage, and built-in dark, UV/IR-cut and dual-band filters. It works in alt-azimuth mode out of the box and supports an equatorial mode with an optional wedge for longer exposures.
Why it stands out: The wide field is the S30 Pro’s secret weapon. Large targets such as the Andromeda Galaxy, the North America Nebula, the Pleiades and the full Moon fit comfortably in a single frame, so you do not need to build mosaics for many of the most popular objects. The higher-resolution sensor delivers noticeably more detailed images than earlier 2 MP models, and ZWO has added special modes for wide Milky Way shots and star trails, plus built-in AI-assisted processing so images look good straight out of the app. ZWO’s app is widely regarded as the most polished in the category.
Limitations: At 30 mm, the aperture is small. Small galaxies and planetary nebulae show less fine detail than they would through the 50 mm Seestar S50 Pro, and images need more stacking time to become smooth. Planets look tiny.
- Pros: excellent app; wide field fits big targets; 8 MP sensor; dual-band filter for nebulae in cities; light and portable; Milky Way and star-trail modes.
- Cons: small aperture limits detail on small targets; EQ mode needs an extra wedge or bundle; planets are small.
If you want a sturdier setup with equatorial mode ready to go, ZWO also sells a Seestar S30 Pro bundle with the TH10 head and TC20 tripod, and the TH10 tripod head with TC20 tripod is available separately.
Check the Seestar S30 Pro price on Amazon →
2. ZWO Seestar S50 Pro: Best Detail Under $1,000 (Direct From ZWO)
The original Seestar S50 was the best-selling smart telescope for several years. ZWO has since replaced it with the Seestar S50 Pro, which keeps the 50 mm aperture (now with a 260 mm focal length) but upgrades to an 8 MP sensor, a much wider field than the original S50, and a larger battery rated for around nine hours. Independent reviewers describe it as the sharpest model in the Seestar lineup, thanks to its larger lens, and it is the better choice if your favorite targets are smaller galaxies, planetary nebulae, the Moon and the Sun. It is heavier than the S30 Pro at about 2.8 kg.
At the time of writing, the S50 Pro is sold mainly through ZWO’s own store and authorized astronomy dealers rather than on Amazon, so we cannot link to it directly. If you see the older Seestar S50 at a clearance price, it remains a capable telescope, but note that its 2 MP sensor and very narrow field mean many targets require mosaics.
3. DWARFLAB DWARF 3: Best for Travel and Versatility

- 【Ultra-Light Design for All Adventures】Only 3lb/1.35kg – World’s Most Portable Smart Telescope! Fits perfectly in standa…
- 【Dual Imaging System for Day & Night】Advanced Dual Lens Design: Telephoto lens masters wildlife & landscape & deep space…
- 【Smart Auto-Tracking & 4K Clarity】Professional 4K Auto-Tracking ensures crystal-clear shots of stars, planets, and wildl…
The DWARF 3 takes a different approach. Instead of one optical tube, it has two lenses: a telephoto lens with a 35 mm aperture and a 150 mm focal length for deep-sky targets, and a wide-angle lens that helps with framing and can capture wide scenes. Both feed 4K-class sensors. The whole package is compact and light (DWARFLAB markets it as a roughly 3 lb design), with a battery rated for around eight hours.
Why it stands out: Versatility. The DWARF 3 has a filter system with a visible-light filter for daytime use, an astro broadband filter, and a dual-band filter for nebulae. That makes it genuinely good at daytime photography and video of wildlife, birds and landscapes, as well as night-sky imaging. Its wide native field suits large targets, it supports an equatorial mode for longer exposures when mounted on a tilting tripod, and its small size makes it ideal for travel, camping and dark-sky trips.
Limitations: It lacks an internal dark filter, so calibration frames require a manual step. Its resolving power trails the 50 mm smart telescopes on small targets. Some reviewers find the DWARFLAB app less consistent than ZWO’s, although it has improved steadily with updates.
- Pros: dual-lens design; excellent for daytime wildlife and landscapes; versatile filters; long battery life; very portable.
- Cons: less fine detail than 50 mm models; no internal dark filter; app can be less polished.
Check the DWARF 3 price on Amazon →
4. DWARFLAB DWARF Mini: Best Budget and Ultralight Pick

- 【Pocket-Sized & Ultra-Lightweight】 Weighing just 1.85 lbs (840g), the DWARF mini easily fits into a backpack or large po…
- 【Intuitive App Control & Built-in Sky Atlas】 Go from unboxing to your first shot in just 3 minutes! The DWARFLAB App pro…
- 【Auto GOTO & 360° Pivot Freedom】 Enjoy pinpoint automated tracking with full 360° rotation. Powered by a high-sensitivit…
If you want to try smart astronomy without spending much, or you need something that disappears into a backpack, the DWARF Mini is one of the most interesting options. It weighs only about 0.84 kg (about 1.85 lb), uses a 30 mm aperture with a 150 mm focal length, and includes built-in dark, astro broadband and dual-band filters. It supports both alt-azimuth and equatorial modes.
Why it stands out: For deep-sky imaging, it delivers impressive results for its size and price, and the built-in dark filter makes calibration easy. It is a great first smart telescope for a teenager or a gift for a curious adult.
Limitations: It uses a 2 MP sensor, so images are less detailed than the 4K models. It lacks a UV/IR-cut filter, so daytime shots can show a color cast. Battery life is the shortest in this group at roughly four to five hours.
- Pros: very light; affordable; built-in dark and dual-band filters; AZ and EQ modes.
- Cons: 2 MP sensor; shorter battery life; weaker for daytime photography.
Check the DWARF Mini price on Amazon →
5. Vaonis Vespera II: Best Premium Design
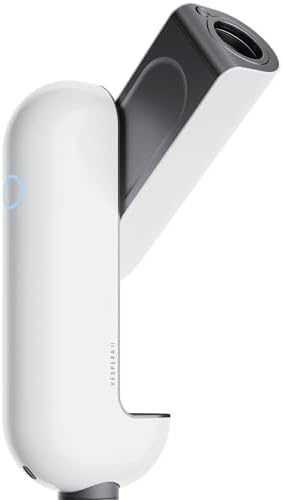
- Product: The Vespera II is a smart, fully automated, and ultra-light smart telescope
- Lightweight: Vespera II is so light you can bring it anywhere with you and experience the universe in the wild
- App Support: The Vespera II can be integrated with the Vaonis mobile app
The French company Vaonis makes some of the most beautiful telescopes ever designed. The Vespera II is a sleek, white, fully automated 50 mm apochromatic refractor that looks more like a piece of modern design than a scientific instrument. It folds into a compact package, sets itself up, and is designed so several people can connect their phones at once, which makes it popular for families, schools and outreach events.
Why choose it: polished hardware, attractive design and group viewing. Vaonis also sells the higher-end Vespera Pro 2, which Amazon lists with a 12.5 MP square sensor and 50 MP mosaic capability, for buyers who want more resolution.
The honest caveat: In terms of optics, the Vespera II’s 50 mm aperture puts it in the same class as ZWO’s 50 mm Seestar, which costs far less. You are paying significantly for design, build and the Vaonis ecosystem. If image quality per dollar is your priority, the Seestar line is better value.
- Pros: beautiful design; easy setup; multi-user viewing; compact for its class.
- Cons: expensive for a 50 mm aperture; image quality similar to much cheaper options.
Check the Vespera II price on Amazon →
6. Unistellar Odyssey: Best Larger Aperture Under $3,000

- Planets and deep sky: Explore galaxies, nebulae and planets with 85 mm optics, a 320 mm focal length and Multi-Depth Tec…
- Focus handled for you: Stellar Autofocus and Smart Star Finder automate focus, sky recognition and target finding; choos…
- App viewing, made for sharing: View and control through the UNISTELLAR app on a compatible phone or tablet; Android 10+ …
Unistellar, another French company, builds larger smart telescopes based on reflecting optics. The Odyssey has an 85 mm aperture according to its Amazon listing, which gathers considerably more light than the 30 to 50 mm models above, along with autofocus, automatic tracking and live image stacking viewed through the app.
Why choose it: The extra aperture helps with fainter and smaller objects. Unistellar has also built a well-known citizen science program in partnership with the SETI Institute, in which owners around the world can contribute observations of events such as asteroid occultations, comets and exoplanet transits. If you love the idea of contributing to real science from your backyard, that community is a genuine draw.
For people who want an eyepiece-like experience, the Odyssey Pro adds a Nikon electronic eyepiece, letting you look into the telescope at the enhanced live image instead of only at your phone.
- Pros: larger aperture; strong citizen science community; electronic eyepiece option on the Pro.
- Cons: much more expensive than ZWO and DWARFLAB; heavier and bulkier; narrower field than the wide-field small models.
Check the Unistellar Odyssey price on Amazon →
7. Celestron Origin Mark II: Best Image Quality (Splurge)

- SUPERIOR OPTICS – Experience unparalleled clarity with the Rowe-Ackermann Schmidt Astrograph design, delivering crisp, w…
- EXPANSIVE VIEWS – A generous 152mm (5.98″) Aperture gathers abundant light, revealing intricate details of distant galax…
- PROFESSIONAL-GRADE IMAGING – Capture breathtaking astrophotography with the advanced optical system, designed for except…
Celestron, one of the oldest names in consumer telescopes, calls the Origin Mark II an “Intelligent Home Observatory,” and it is in a different league from the compact smart telescopes. It uses 6-inch (152 mm) Rowe-Ackermann Schmidt Astrograph (RASA) optics with an extremely fast focal ratio of about f/2.2, paired with a Sony STARVIS sensor, on a computerized mount that handles plate solving, tracking and live stacking automatically.
Why choose it: The combination of large aperture and very fast optics gathers light at a remarkable rate, producing detailed, colorful images of faint nebulae and galaxies in a fraction of the time smaller smart telescopes need. Independent reviews consistently rank it at or near the top of the category for image quality.
The trade-offs: It is expensive and heavy, at close to 19 kg (around 42 lb), so it is better suited to a backyard or a permanent setup than to travel.
- Pros: best-in-class image quality; large, fast optics; fully automated; from a long-established brand.
- Cons: very expensive; heavy and not very portable; overkill for casual users.
Check the Celestron Origin Mark II price on Amazon →
8. Celestron StarSense Explorer DX 130AZ: Best Traditional Alternative

- SMARTPHONE-POWERED SKY TOUR: No experience needed! Just dock your phone, launch the StarSense Explorer app, and follow t…
- PATENTED STARSENSE TECHNOLOGY: Unlike other astronomy apps, StarSense Explorer uses sky recognition technology to turn y…
- TONIGHT’S BEST TARGETS, INSTANTLY: The app generates a curated list of the top objects to see based on your time and loc…
Not everyone wants a screen. If what excites you is looking at the rings of Saturn, the cloud belts of Jupiter or the craters of the Moon with your own eyes, a traditional telescope still wins, and the StarSense Explorer DX 130AZ combines that experience with modern convenience. It is a 130 mm reflector with a smartphone dock: Celestron’s StarSense app uses your phone’s camera to recognize the sky and shows arrows guiding you to each object, so you get the “where do I point it?” help that makes smart telescopes so appealing, while still observing through an eyepiece.
Why choose it: more aperture than most smart telescopes for the price, real-time views of planets, and the joy of seeing objects with your own eyes. If you are on a tighter budget, the smaller StarSense Explorer LT 114AZ offers the same app guidance in a lighter package. For the best planetary views at a reasonable price, an 8-inch Dobsonian such as the Sky-Watcher Classic 200 shows far more planetary detail than any small smart telescope. Our guide to the best telescopes under $150 for beginners covers more budget-friendly options.
- Pros: real eyepiece views; good aperture for the price; app helps you find objects; great for planets and the Moon.
- Cons: no automatic imaging; faint objects look gray and subtle by eye; you need dark skies for the best deep-sky views.
Check the StarSense Explorer DX 130AZ price on Amazon →
Smart Telescope Comparison Table
| Model | Aperture / Focal Length | Sensor | Weight | Battery | Standout |
|---|---|---|---|---|---|
| ZWO Seestar S30 Pro | 30 mm / 160 mm | 8 MP (4K) | About 1.65 kg | About 6 h | Wide field, best app |
| ZWO Seestar S50 Pro | 50 mm / 260 mm | 8 MP (4K) | About 2.8 kg | About 9 h | Sharpest small-target detail in its class |
| DWARFLAB DWARF 3 | 35 mm / 150 mm plus wide lens | 4K class | About 1.3 kg | About 8 h | Day and night versatility |
| DWARFLAB DWARF Mini | 30 mm / 150 mm | 2 MP | About 0.84 kg | About 4 to 5 h | Lightest and cheapest |
| Vaonis Vespera II | 50 mm apochromat | See listing | Compact | See listing | Design and group viewing |
| Unistellar Odyssey | 85 mm | See listing | Heavier | See listing | Larger aperture, citizen science |
| Celestron Origin Mark II | 152 mm RASA, about f/2.2 | Sony STARVIS | About 19 kg | Mains or battery pack | Best image quality |
Specifications are taken from manufacturer listings and independent reviews and can vary slightly between production batches and firmware versions. Weight and battery figures are approximate.
Smart Telescope Buying Guide: What Really Matters
Aperture: the single biggest factor
Aperture is the diameter of the main lens or mirror. A larger aperture collects more light and resolves finer detail. Light-gathering power rises with the square of the aperture, so a 50 mm lens gathers almost three times as much light as a 30 mm lens, and an 85 mm optic gathers about eight times as much. More light means smoother images in less time and more detail in small targets. If you can afford it and portability is not critical, more aperture is almost always better.
Focal length and field of view
Focal length determines magnification and field of view. A short focal length gives a wide view that fits big objects like the Andromeda Galaxy and large nebulae; a longer focal length gives a narrower, more magnified view suited to small galaxies and planetary nebulae. Many smart telescopes offer mosaic modes that stitch several frames together to cover large objects, but a wide native field is more convenient.
Sensor resolution
Newer models use 8 MP (4K-class) sensors instead of older 2 MP sensors. Higher resolution helps when your optics can make use of it and when you want to crop or print images. It is not everything, though: a larger aperture with a 2 MP sensor can still outperform a tiny aperture with a high-resolution sensor on small targets.
Filters: why dual-band matters in cities
Many nebulae glow mainly at specific wavelengths of light emitted by hydrogen (hydrogen-alpha) and oxygen (oxygen III). A dual-band filter lets those wavelengths through while blocking much of the broad glow from streetlights and skyglow. For anyone observing from a city or suburb, a built-in dual-band filter makes an enormous difference on emission nebulae. It helps much less with galaxies and star clusters, which emit across the spectrum, so a dark sky is still the best upgrade for galaxy imaging.
Alt-azimuth versus equatorial mode
Most smart telescopes use an alt-azimuth mount, which moves up and down and left and right. As Earth rotates, objects appear to rotate in the field of view over time when tracked this way, an effect called field rotation. Smart telescopes cope by keeping each exposure short and rotating frames during stacking, but field rotation limits individual exposure length and can affect the edges of images. Equatorial mode, available on many models with an optional wedge or tilting tripod, aligns the telescope with Earth’s axis so field rotation disappears, allowing longer exposures and cleaner results. It is a worthwhile upgrade once you are hooked.
Battery life and power
Deep-sky images improve with longer stacking time, so battery life matters. Most compact models last between about four and nine hours on their internal batteries. Many can also run from a USB-C power bank, which is an inexpensive way to extend sessions.
Weight and portability
The darker the sky, the better smart telescopes perform, so a light model you will actually take on trips can produce better images than a heavy one that stays in a light-polluted backyard. Compact models weigh between roughly 1 and 3 kg; premium larger ones are considerably heavier.
The app and ecosystem
You will interact with your smart telescope entirely through its app, so app quality matters as much as hardware. Look for reliable connection, sensible target suggestions, easy exposure control, raw file export for later processing, and regular firmware updates. ZWO’s Seestar app currently has the strongest reputation for polish.
Smart or traditional?
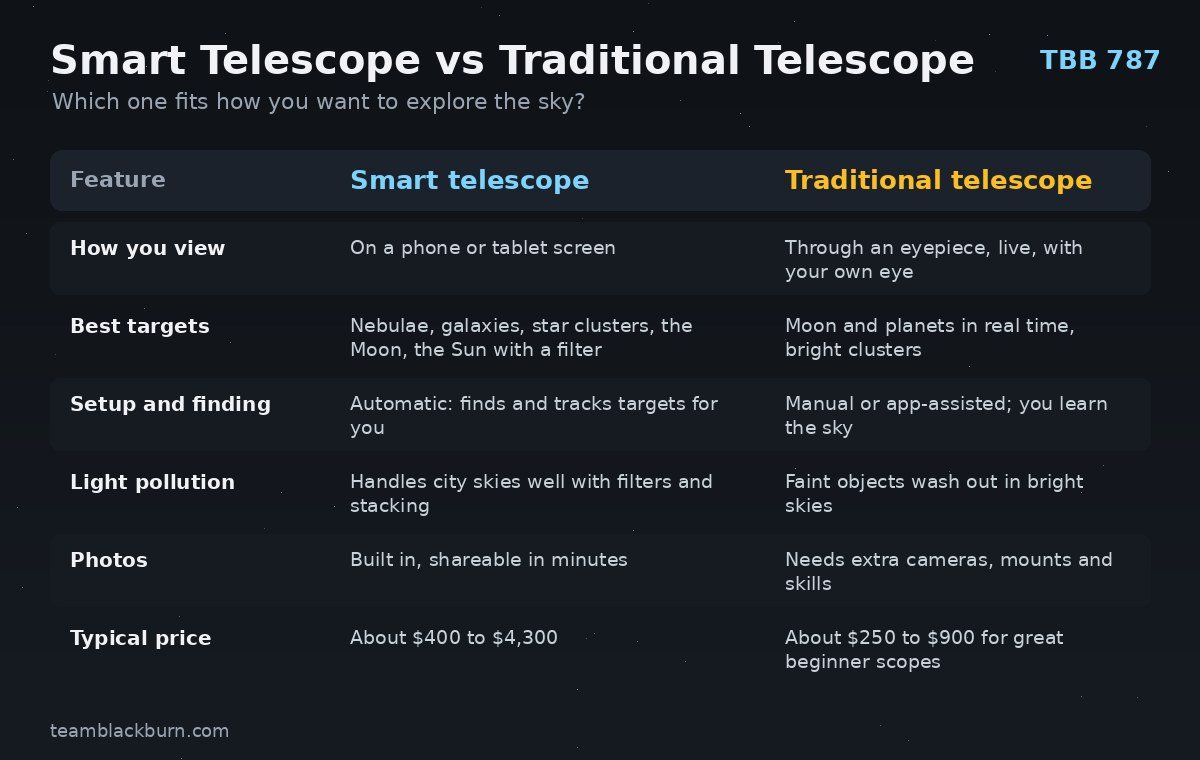
Choose a smart telescope if you want to see and photograph nebulae and galaxies quickly, live in a light-polluted area, value convenience, or want to share images. Choose a traditional telescope if you most want to see the Moon and planets with your own eyes in real time, enjoy learning the sky, or want maximum aperture per dollar. Many enthusiasts end up with both: a smart telescope for deep-sky imaging and a Dobsonian for planets.
Your First Night With a Smart Telescope
- Charge everything during the day: the telescope, your phone or tablet, and a power bank.
- Install and update the app at home and update the telescope’s firmware over Wi-Fi before your first session.
- Pick a site: a stable, level surface with a clear view of the sky, away from direct lights if possible. A sturdy tripod helps.
- Power on and connect. Let the telescope run its initialization and plate solve.
- Start with a bright, easy target such as the Moon, the Pleiades, or a bright nebula like the Orion Nebula in winter or the Lagoon Nebula in summer.
- Be patient. Let the telescope stack for at least 10 to 20 minutes on deep-sky targets. Watch the image improve.
- Save the image and the raw files so you can process them later.
- Try a second target of a different type, like a galaxy or a globular cluster.
Best Smart Telescope Targets by Season (Northern Hemisphere)
Winter
- Orion Nebula (M42): the brightest nebula in the sky and the perfect first target.
- Horsehead and Flame Nebulae: a classic pairing near Orion’s belt; dual-band filters help.
- Pleiades (M45): a beautiful blue-tinged star cluster wrapped in faint nebulosity.
- Rosette Nebula: a large, flower-shaped nebula that suits wide-field models.
- Crab Nebula (M1): the remains of a supernova recorded by astronomers in 1054.
Spring
- Whirlpool Galaxy (M51): a face-on spiral galaxy interacting with a companion.
- Leo Triplet: three galaxies in one field.
- Bode’s and Cigar Galaxies (M81 and M82): a striking pair in Ursa Major.
- Pinwheel Galaxy (M101): a large, faint spiral that rewards long stacking.
Summer
- Lagoon and Trifid Nebulae (M8 and M20): a colorful pair toward the center of our galaxy.
- Eagle Nebula (M16): home of the famous Pillars of Creation.
- Ring Nebula (M57) and Dumbbell Nebula (M27): planetary nebulae formed by dying stars.
- Hercules Cluster (M13): a globular cluster with hundreds of thousands of stars.
- North America Nebula: a large target that shines with a dual-band filter.
Autumn
- Andromeda Galaxy (M31): the nearest large spiral galaxy, about 2.5 million light-years away.
- Triangulum Galaxy (M33): a face-on spiral that needs dark skies and patience.
- Veil Nebula: delicate filaments from an ancient supernova.
- Helix Nebula: a large, faint planetary nebula sometimes called the “Eye of God.”
Tips for Better Smart Telescope Images
- Stack longer. An hour of total exposure looks dramatically better than ten minutes, especially on faint galaxies. Some apps let you combine sessions from multiple nights.
- Get away from lights. Even a short drive to darker skies can transform galaxy images. Light pollution maps help you find nearby dark sites.
- Avoid the Moon for faint targets. Moonlight brightens the whole sky. Image nebulae with a dual-band filter around the full Moon and save galaxies for darker nights.
- Prevent dew. On humid nights, moisture can fog the lens. A USB dew heater strap powered from a power bank helps prevent this.
- Level and stabilize. Wind and wobbly surfaces cause trailing. A sturdy tripod and a sheltered spot help.
- Use equatorial mode for longer individual exposures once you are comfortable with the basics.
- Process raw files. Free software such as Siril can stack and stretch raw files for more detail than the app’s quick preview.
- Keep firmware updated. Manufacturers regularly add features and improve image processing.
Light Pollution and the Bortle Scale Explained
The darkness of your sky affects your results more than almost any equipment choice. Astronomers often describe sky darkness using the Bortle scale, which runs from 1 (an exceptionally dark site far from any lights, where the Milky Way casts shadows) to 9 (an inner-city sky where only the brightest stars are visible). Most suburbs fall around 5 to 7, and city centers around 8 or 9.
Light pollution adds a bright, often orange-tinted glow to the background of every image, which drowns out faint galaxies and the outer regions of nebulae. Smart telescopes fight back in two ways. First, stacking many exposures improves the contrast between faint objects and the sky. Second, dual-band filters block most artificial light while letting through the specific wavelengths emitted by emission nebulae. This is why a smart telescope in a city can still produce impressive images of the Orion or Lagoon nebulae, but will struggle more with galaxies like the Triangulum Galaxy.
You can find the darkest sites near you using free online light pollution maps. Even moving from a Bortle 8 city center to a Bortle 5 rural area makes a dramatic difference, and a portable smart telescope makes those trips easy.
Smart Telescope Accessories Worth Buying
- A sturdy tripod or tripod head: Many smart telescopes include a small tripod that works on a table, but a taller, more stable tripod improves comfort and reduces vibration. ZWO’s TH10 head and TC20 tripod is designed for the Seestar line and supports equatorial mode.
- An equatorial wedge or tilting head: Needed for equatorial mode on many models, enabling longer exposures without field rotation. Check your telescope maker’s compatible options.
- A USB-C power bank: A high-capacity USB-C power bank extends imaging sessions well beyond the internal battery.
- A dew heater strap: A USB dew heater strap keeps the lens clear on humid nights.
- A red flashlight: A red astronomy flashlight lets you see your equipment without ruining your night vision.
- A padded carrying case: Protects your investment when traveling to dark sites. Many manufacturers sell fitted cases.
- A certified solar filter: Only use the filter specified by your telescope’s manufacturer for solar imaging.
How to Process Smart Telescope Images (Beginner Workflow)
The images your smart telescope produces in its app are ready to share, but most models also let you export the individual raw frames or a stacked raw file. Processing them yourself can reveal noticeably more detail. Here is a simple beginner workflow using free software.
- Export your files. Download the raw or FITS files from the telescope or the app to your computer.
- Stack (if needed). If you exported individual frames, stack them in a free program such as Siril, which aligns and combines them and rejects bad frames, such as those affected by passing satellites or clouds.
- Remove gradients. Light pollution and moonlight create uneven background brightness. Background extraction tools in Siril or the free tool GraXpert flatten the background.
- Color calibrate. Use the color calibration tools to make star colors realistic and remove color casts.
- Stretch the image. Raw astronomical data looks almost black because the faint detail is compressed into a narrow range. Stretching brightens the faint parts while keeping stars under control.
- Reduce noise and sharpen gently. A little noise reduction smooths the background. Be careful not to overdo it, which creates an artificial, plastic look.
- Final touches. Adjust saturation, contrast and cropping in any photo editor.
Processing is optional, and many owners never do it. But it is a rewarding skill, and it is a good way to learn how professional astronomers turn raw data into the stunning images released by observatories and space telescopes.
Common Smart Telescope Problems and How to Fix Them
- Plate solving fails. This usually happens when clouds, haze, trees or buildings block the view, or the lens is fogged. Move to a clearer patch of sky, wait for clouds to pass, check the lens for dew, and make sure the telescope is not pointing too close to the horizon.
- Stars look elongated or trailed. Wind, an unstable surface or a loose tripod can cause trailing. Shelter the telescope, tighten the tripod, and avoid bumping the table during exposures. In alt-azimuth mode, targets near the zenith (directly overhead) can also be harder to track.
- The image looks noisy or grainy. This is normal early in a stack. Let the telescope keep stacking; noise drops as more frames are added. Warm summer nights also increase sensor noise, so longer stacks help more in summer.
- The background is bright orange or green. That is light pollution or moonlight. Use the dual-band filter for nebulae, image on moonless nights for galaxies, and remove gradients during processing.
- The app disconnects. Keep your phone close to the telescope, disable battery saver modes that close background apps, and update both the app and firmware. Some models offer a station mode that connects through your home Wi-Fi for a longer range.
- Images look soft. Run the autofocus routine again, especially after temperature changes as the night cools. Check that the lens is clean and free of dew.
- Satellite trails appear. Most stacking routines reject them automatically. If some remain, processing software can remove them.
- Battery runs out quickly in the cold. Lithium batteries lose capacity in low temperatures. Keep the telescope and power bank warm until you start, and use an external power bank for long winter sessions.
Almost every problem new owners encounter has a simple fix, and the communities around each brand are generally friendly and helpful. Owner forums and groups are excellent places to share images and ask questions.
Smart Telescopes for Kids and Families
Smart telescopes can be wonderful for families because results appear quickly, everyone can watch on a screen at the same time, and kids do not need the patience and dexterity required to aim a manual telescope. A child can choose targets in the app, watch the image build up, and then share the result with friends and teachers the next day.
A few tips help: start with bright, exciting targets like the Moon and the Orion Nebula; explain what each object is (a cloud where new stars are forming, a galaxy of billions of stars) so the image has meaning; and plan sessions early in the evening so younger children can enjoy them before bedtime. Pair the experience with a good space book or a visit to a planetarium, and you may spark a lifelong interest. For more ideas, see our guide to the best gifts for science lovers.
Frequently Asked Questions
Are smart telescopes worth it?
For people who want to see and photograph nebulae and galaxies without years of learning, yes. They remove the hardest parts of astrophotography and work well even from light-polluted areas. If your main interest is viewing planets with your own eyes, a traditional telescope is better value.
Which smart telescope is best for beginners?
For most beginners, the ZWO Seestar S30 Pro offers the best combination of image quality, wide field, ease of use and price. The DWARF Mini is the best lower-cost option, and the DWARF 3 is best if you also want daytime wildlife and landscape photography.
Can you look through a smart telescope?
Most smart telescopes have no eyepiece; you view the image on a phone or tablet. Some premium models, such as the Unistellar Odyssey Pro, include an electronic eyepiece showing the enhanced live image.
Can smart telescopes see planets?
Yes, but planets appear small because smart telescopes have short focal lengths and wide fields. You can see Saturn’s rings and Jupiter’s moons, but for detailed planetary views, a larger traditional telescope is far better.
Do smart telescopes work in cities?
Surprisingly well, especially on emission nebulae when using a dual-band filter. Galaxies are harder from bright skies, but stacking still reveals them. Darker skies always improve results.
How long does it take to get a good image?
Bright objects like the Orion Nebula look impressive within a few minutes. Fainter galaxies benefit from 30 minutes to several hours of total stacking time.
Is the Seestar S30 Pro better than the S50?
They suit different targets. The S30 Pro has a wider field that fits large objects and a newer 8 MP sensor. The 50 mm models gather more light and resolve finer detail on small targets. The newer S50 Pro combines the larger aperture with an 8 MP sensor and a wider field than the original S50.
Can I photograph the Sun with a smart telescope?
Many models support solar imaging, but only with the manufacturer’s certified solar filter properly fitted over the front of the telescope. Never point any telescope at the Sun without a proper solar filter, and never let children operate solar imaging unsupervised.
Do I need a computer?
No. Everything runs from the app on a phone or tablet. A computer is optional for advanced processing of raw files.
Final Verdict
For most people starting out in 2026, the ZWO Seestar S30 Pro is the smart telescope to buy: it is easy, portable, and its wide field and 4K sensor make the most popular deep-sky objects look fantastic. Choose the DWARF Mini to save money or weight, the DWARF 3 for travel and daytime photography, or the Seestar S50 Pro from ZWO for more detail on small targets. If budget is not a constraint, the Celestron Origin Mark II delivers the best images in the category. And if your heart is set on seeing Saturn’s rings with your own eyes, start with a traditional telescope like the StarSense Explorer DX 130AZ instead.
Whichever you choose, you will be part of a long tradition of curiosity that runs from Galileo’s first telescope to the space missions we describe in our history of the Space Race. Clear skies.
Related guides: 50 best gifts for science lovers and Stephen Hawking’s life and black hole discoveries.